







Choosing the right Hydraulic Fittings is not a matter of matching shapes on a catalog page. These small components control pressure, flow, safety, and service life. One incorrect thread or seal can create a slow leak, damaged equipment, or sudden downtime. Pressure matters. Temperature matters too.
A reliable selection starts with the system specifications. Check the working pressure, peak pressure, fluid type, temperature range, and hose size. Confirm whether the connection uses NPT, BSP, JIC, ORFS, metric, or another thread standard. Never assume similar threads will seal safely. They may appear identical under poor lighting. They are not always interchangeable.
Material choice also requires practical judgment. Stainless steel may suit corrosive environments, while carbon steel can serve many standard hydraulic applications. Seal materials must tolerate the chosen fluid and operating temperature. Review manufacturer data, certification documents, and installation instructions before ordering. Experienced technicians also inspect hose routing, vibration, bend radius, and access for future maintenance. A fitting can meet its pressure rating and still fail because the hose is twisted.
The “best” option depends on the complete assembly, not one component. This point is easy to overlook. I would also avoid choosing by price alone, because a cheap fitting may increase replacement and labor costs. When uncertain, consult a qualified hydraulic professional and verify every dimension. Careful measurement, documented specifications, and controlled installation provide the most dependable result. Mistakes happen. Good selection practices make them less likely.
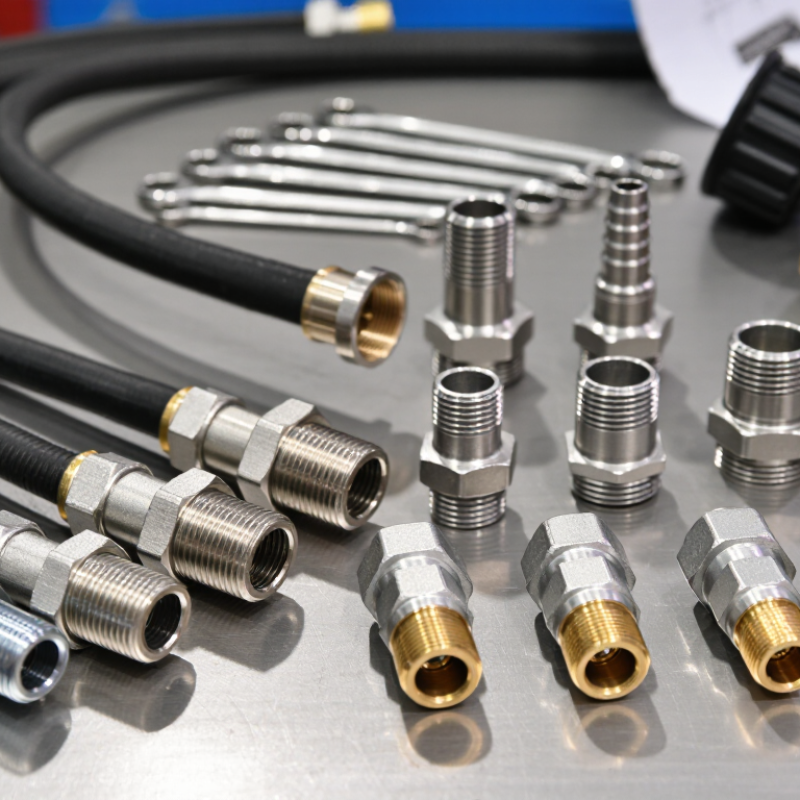
How to Choose the Right Hydraulic Fittings?
Classify each circuit by service before selecting a hydraulic fitting. Pressure lines carry pump output and require fittings rated above the system’s maximum working pressure. Include pressure spikes, not only the gauge reading. A fitting may survive steady pressure but fail under repeated pulses. I inspect the hose, thread form, sealing method, and available space together. A correct pressure rating is not enough.
Return lines usually operate at lower pressure, but excessive backpressure can damage seals and reduce actuator performance. Choose fittings with a suitable flow passage and avoid sharp, unnecessary restrictions. Suction lines need special attention. They should support high flow with minimal pressure loss. Use larger passages and fittings with strong collapse resistance. A small inlet fitting can encourage cavitation, noise, and unstable pump operation. Keep the connection short where possible.
Instrumentation circuits demand precision rather than simple strength. Small-bore fittings should seal reliably and avoid dead spaces that trap air or contamination. Confirm the thread standard, tube size, temperature range, and fluid compatibility before installation. Cleanliness matters; one metal chip can affect a sensitive pressure reading. In field work, I have seen technicians match threads correctly but overlook seal material. That mistake is easy to repeat. I still verify every connection against the circuit function and the equipment documentation. Some layouts look acceptable until heat, vibration, and maintenance access are considered. Test carefully.
Choosing the right hydraulic fitting starts with fluid velocity, not just thread size. For pressure lines, a practical target is 3–5 m/s. This range can balance compact piping with controlled pressure loss. Measure the required flow rate first. Then calculate the internal area using A = Q ÷ v. The resulting bore is more useful than the nominal connection size.
For example, a 30 L/min pressure line carries 0.0005 m³/s. At 4 m/s, the required flow area is about 125 mm². This gives an internal diameter near 12.6 mm. Select a fitting with a similar passage, not merely a matching outside thread. A narrow shoulder inside the fitting can create turbulence, heat, and unnecessary noise. Small details matter.
Check the fitting’s pressure rating, material compatibility, temperature range, and sealing method. Inspect the actual bore, because catalog dimensions may not show every restriction. In field installations, I have seen a correctly sized hose paired with an undersized elbow. The calculated velocity looked acceptable, but the system still lost pressure. That mistake is easy to repeat. Measure twice. Consider every bend, adapter, and valve in the line. If the calculated velocity approaches 5 m/s, allow more margin for contamination, aging, and uncertain flow demand. A slightly larger passage may improve reliability, although it can increase cost and space requirements. Recheck the design after installation.
Choosing the right hydraulic fitting begins with pressure and temperature, not appearance. Check the system’s maximum working pressure, including short pressure spikes. The fitting’s rating must exceed that value with a practical safety margin. A pump may run at 210 bar, yet startup surges can rise higher.
Temperature matters just as much. Confirm the fitting, tube, seal, and hydraulic fluid can tolerate the highest and lowest operating temperatures. Heat can reduce material strength and shorten seal life. Cold conditions can make seals stiff and less effective. I have seen a connection pass a pressure test, then leak after repeated heating cycles.
Use SAE J514 or ISO 8434 requirements to verify thread forms, dimensions, materials, and performance expectations. These standards help prevent mismatched connections, but they do not make every fitting interchangeable. Compare thread type, size, sealing method, and tube wall thickness before assembly. A visual match is not enough. Measure it.
Install the fitting with the specified torque and proper alignment. Do not force a misaligned tube into position. That stresses the joint and can damage the sealing surface. Clean each connection carefully; one small particle may create a persistent leak. Test the assembled line gradually, using suitable protection and documented pressure readings. Recheck after the first operating cycle. I still treat this step as essential, because real systems rarely behave exactly like workshop calculations.
How to Choose the Right Hydraulic Fittings?
Choosing a hydraulic fitting starts with identification, not appearance. NPT and BSPP fittings can look nearly identical on a crowded workbench. They are not interchangeable. NPT uses tapered threads, while BSPP uses parallel threads. Their thread angles and pitch standards can also differ. A fitting may start turning smoothly and still be wrong.
Confirm the thread type with a thread gauge and a reliable fitting chart. Measure the outside diameter with calipers, then check the thread pitch. Do not rely on nominal size alone. A 1/2-inch fitting can describe different standards. Inspect the sealing method as well. NPT usually seals through the tapered thread with an approved sealant. BSPP generally needs an O-ring, bonded washer, or another face seal. The seal carries the responsibility.
Tube size matters just as much. Measure the tube’s outside diameter, not only its inside opening. Check whether the fitting uses a compression sleeve, flare, or bite-style connection. Match the fitting material to the fluid, pressure, temperature, and vibration level. In practical inspections, mismatched threads often leave fine metal damage around the port. That damage may appear before a visible leak. It is an easy warning to miss. I have also seen installers tighten a leaking connection further, which made the problem worse. A drawing, gauge, and careful inspection are slower than guessing, but cheaper than repeated failures.
| Selection Dimension | What to Confirm | Key Technical Facts | Identification Method | Correct Selection Guidance |
|---|---|---|---|---|
| Thread Standard | Determine whether the port or fitting uses NPT, BSPP, BSPT, or a metric thread. | NPT is a tapered pipe thread covered by ANSI/ASME B1.20.1. BSPP is a parallel pipe thread commonly designated G under ISO 228-1. BSPT is a tapered pipe thread commonly designated R under ISO 7-1. | Check the equipment documentation first. If documentation is unavailable, inspect the thread profile, measure the pitch, and compare the outside diameter with a thread chart. | Do not select a fitting only because its nominal size appears similar. NPT, BSPP, and BSPT are different thread systems and are not automatically interchangeable. |
| NPT Thread | Confirm that both mating parts are NPT and that the size designation matches. | NPT uses a 60-degree thread form and a 1:16 taper. The thread itself normally performs the mechanical engagement, while a suitable sealing method is used on the threads. | NPT threads are tapered: the outside diameter gradually changes along the threaded length. Use a calibrated thread gauge or verified dimensional chart for confirmation. | Use an NPT fitting only with a compatible NPT port. Apply a sealant approved for the hydraulic fluid and pressure range when the system design requires thread sealing. |
| BSPP Thread | Confirm the thread is parallel and identify the sealing face or sealing element. | BSPP uses a parallel thread with a 55-degree Whitworth thread form. The thread generally locates and retains the fitting; sealing is typically provided by an O-ring, bonded seal, sealing washer, or another defined interface. | The outside diameter remains substantially constant along the threaded section. Look for an O-ring groove, sealing shoulder, or washer seat. | Match the BSPP thread size and use the specified seal at the port face. Do not rely on thread interference alone unless the fitting design specifically requires it. |
| BSPT Thread | Verify that the port and fitting both use the tapered BSPT system. | BSPT uses a 55-degree Whitworth thread form and a taper. It is a different standard from NPT even though both are tapered pipe threads. | Measure the thread pitch and compare the flank angle and nominal dimensions with the applicable standard. Visual similarity is not sufficient for identification. | Do not substitute BSPT for NPT or NPT for BSPT. Differences in pitch, flank angle, and diameter can cause leakage, thread damage, or unsafe connection strength. |
| Tube Outside Diameter | Measure the actual tube outside diameter rather than relying only on the nominal tube size. | Tube fittings are commonly selected by tube outside diameter. A fractional tube size such as 1/2 inch refers to a 0.500-inch outside diameter in many tube-fitting systems; verification is still required. | Use a calibrated micrometer or vernier caliper on a clean, undamaged section of tube. Measure several points if the tube may be oval or deformed. | Select a fitting that matches the measured tube outside diameter and the tube material, wall thickness, and connection type. |
| Metric Tube Size | Confirm whether the tube is specified in millimeters and record the exact outside diameter. | Metric tube sizes are identified by outside diameter in millimeters, such as 6 mm, 8 mm, 10 mm, or 12 mm. A metric tube should not be treated as an inch tube with a similar nominal dimension. | Measure the tube outside diameter in millimeters and compare it with the fitting specification. Check the thread separately because tube size and port thread are independent dimensions. | Use a metric tube fitting for a metric tube unless the connection is specifically designed and approved for another tube system. |
| Seal Design | Identify where the seal is created: on the thread, at a cone, on a face, or with an O-ring. | Common hydraulic sealing designs include tapered-thread sealing, 24-degree tube cones, 37-degree flare connections, O-ring face seals, and O-ring boss connections. | Inspect the fitting geometry for a cone, flare angle, O-ring groove, bonded washer, or flat sealing face. Never select a seal by thread size alone. | The fitting, port, and seal must share the same sealing design. Replace damaged, flattened, cut, or chemically incompatible seals before assembly. |
| O-Ring Material | Match the elastomer to the hydraulic fluid, temperature, pressure, and environmental conditions. | Elastomer compatibility varies. For example, nitrile rubber is widely used with many petroleum-based hydraulic fluids, while other fluids and temperature ranges may require a different elastomer. | Check the equipment specification or seal material marking. Consider fluid composition, operating temperature, ultraviolet exposure, and chemical contact. | Do not replace an O-ring with an unknown material or an incorrect cross-section. Use the specified size and a fluid-compatible material. |
| Thread Pitch | Confirm threads per inch for inch-based threads or millimeters per thread for metric threads. | Two threads can have similar outside diameters but different pitches. A pitch mismatch may allow partial engagement while preventing reliable sealing or full mechanical strength. | Use a thread pitch gauge. For inch threads, count threads per inch; for metric threads, measure the distance from one thread crest to the next. | Never force a fitting with a different pitch. Cross-threading can permanently damage the port and may create a hidden pressure failure. |
| Pressure and Temperature | Verify the fitting rating for working pressure, impulse pressure, vacuum service, and operating temperature. | The allowable rating depends on the fitting material, size, connection design, tube wall thickness, temperature, and installation method. The weakest component limits the assembly. | Use the applicable technical specification and confirm derating requirements at elevated temperature or under dynamic pressure conditions. | Select a fitting with a working rating suitable for the complete operating envelope, including pressure spikes and temperature extremes. |
| Installation Check | Confirm cleanliness, alignment, torque, and final leak-test requirements. | Contamination, side loading, excessive torque, insufficient tube insertion, and misalignment can cause leakage even when the thread type is correct. | Inspect threads and sealing surfaces, install the fitting according to its connection design, and perform a controlled pressure or leak test before service. | Keep protective caps in place until assembly, avoid mixing sealants with incompatible fluids, and never tighten a pressurized connection. |
How to Choose the Right Hydraulic Fittings?
Before torque-controlled installation, verify both pressure margins. ISO 19879:2021 evaluates hydraulic connections at proof pressure of 1.5 times maximum working pressure and burst pressure near 4 times that rating. These figures are not decorative specifications. They define how much pressure a fitting should tolerate during testing and sudden overload conditions.
Check the working-pressure mark against the actual circuit pressure, including spikes. A gauge may show 210 bar, while a fast-closing valve creates a higher transient. Choose fittings rated above that operating condition. ISO 4413 also stresses pressure control, secure connections, and protection from hose movement. A clean fitting can still be wrongly selected. That mistake is easy to miss.
Use the manufacturer’s torque value for the exact thread, material, and seal design. Do not substitute hand-tight judgment. Hold the fitting with one wrench and apply torque with another. Inspect the tube for scratches, ovality, or misalignment. After pressurization, check for seepage without touching the joint. Torque alone cannot repair damaged threads. I have seen neat installations fail because the pressure rating was checked last. That sequence deserves reconsideration.
Hein Minnie
Cell nr: +27 (0) 82 564 6501
Email: sale@thecirclemachine.com
Hein Minnie Jnr
Cell nr: +27 (0) 84 284 7234
Email: sale@thecirclemachine.com
Address:
10 Apsey Street,
Heidelberg,
Gauteng,
1441
Bendet Engineering Services (PTY) LTD was established in 1987. Our team of engineers and draughtsman are ready to deliver a complete turnkey solution, from the design phase to commissioning. A dedicated team that consists of electrical, mechanical and industrial engineers, we are able to offer a comprehensive service to our clients.